Couldn’t believe that Christmas, the season to drink and be merry, eat and be jolly is finally around the corner !!! I believe everyone is excited unless there is a Grinch living in you! (just kidding XP). There’s many reason I absolutely love and adore Christmas aside from watching my favourite Christmas movie, Home Alone all over again! Christmas season is all about getting festive ready for the home and ourself. To inject more Christmas spirit without looking like an elf or Christmas tree, I always prefer to create some themed nails. Hence, I can wear them for a whole freaking month and change them whenever I like! So instead of risking looking a little too costumey, why not check out some nails inspirations below which I’ve rounded up for you.
1. Candy Cane Nails

Whenever you think of Christmas, you will think of candy canes as both of them always come hand in hand.
This candy cane nails are super easy to create and of course they look so cute on the nails!
Things You Need:
- Base Coat
- Gold Shimmering Nail Polish
- Red Liquitex Acrylic Paint
- White Liquitex Acrylic Paint
- A paint brush
- Top Coat
Instructions:
- Paint your nail bed with a layer of base coat.
- Once your base coat has completely dried, it’s time to paint your nails with gold shimmering nail polish. I will suggest you to paint two layers so that the nail colours can turn out nicely and even.
- When all the nails are dry, take a brush and dip into white liquitex acrylic paint and draw a J on the tip of the nails.
- Then, wait for a couple of minutes until all of them are dry in order to decorate the candy cane with red liquitex acrylic paint.
- Lastly, paint your nails with a layer of top coat and you will have the perfect candy cane nails.

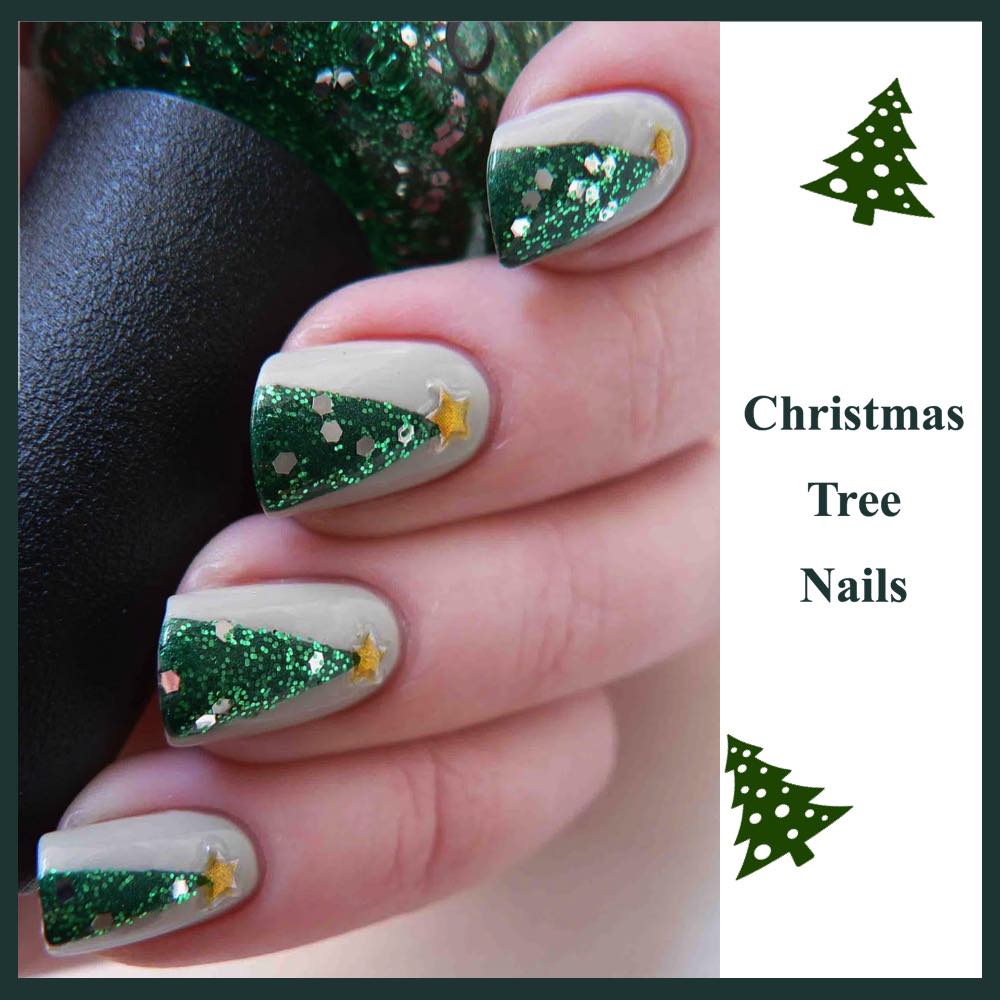
2. Christmas Tree Nails

A simple Christmas tree design is the easiest way to wear your holiday spirit on your fingertips.
Things You Need:
- Base Coat
- Light Green Nail Polish
- Forest Green Nail Polish
- Glitter Nail Polish
- Star Sticker or star-shaped rhinestone
- Top Coat
Instructions
- Apply a base coat on all your nails.
- After the base coat has completely dried, apply the light green shade of nail polish. I will suggest you to paint two layers so that the nail colours can turn out nicely and even.
- Then, wait for at least 30 minutes to proceed to the next step as the next step requires tape.
- Cut one to two inch segments of tape in half and placed the straight edge along the nails to create the triangle shape.
- Next, paint a coat of the deep green shade over the tape to create your Christmas tree.
- While the paint was still wet, paint a layer of glittering polish to add the ornaments and lights to my tree.
- Peel the tape off and you will have a sparkling triangle.
- Lastly, to make it really look like a Christmas tree, add a star-shaped rhinestone or star sticker to the top of my trees with nail glue.

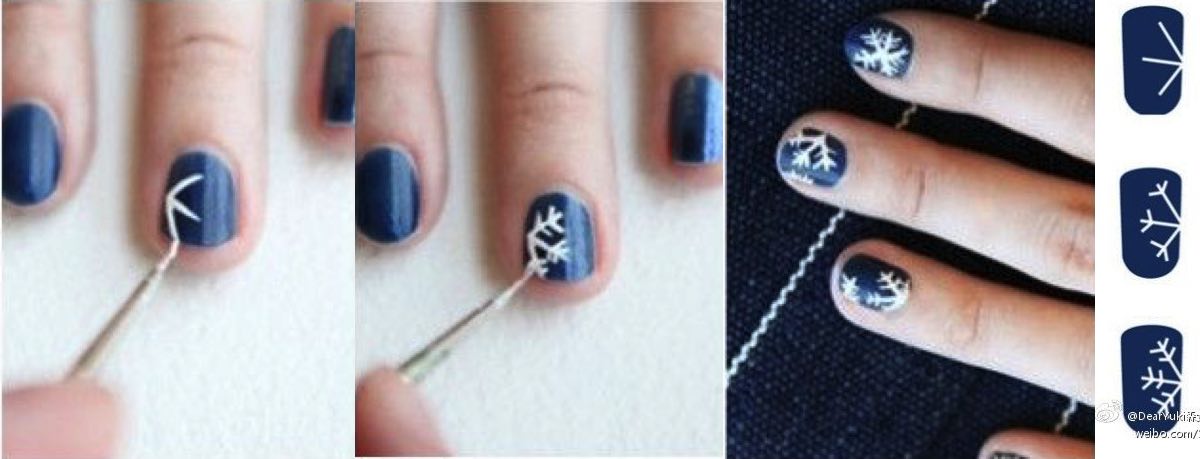
Create that romantic winter snowfall nails easily with the combination of midnight blue and white nail polish.
Things You Need:
- Base Coat
- Midnight Blue Nail Polish
- White Nail Polish
- Top Coat
- Brush
Instructions:
- Always use a good base coat whenever you’re going to paint darker colors. This is to keep your nails from getting stained if they’re porous.
- Once your base coat has completely dried, it’s time to paint your nails with midnight blue shade.
- When all the nails are dry, take a brush and dip into white nail polish and start to draw your ideal snowflakes on your nails. You can either draw on eery single nails or just one. The choices are in your hands.
- Then, wait for them to dry before applying the top coat to create that glossy look.

4. Christmas Checkers

If you are a huge fan of Christmas flannels like me, this Christmas Checkers inspired Nails will make you fall head over heels!
Things You Need:
- Base Coat
- Red Nail Polish
- Slightly Sheer Darker Red Nail Polish
- Black Nail Polish
- Gold Striper
- Top Coat
Instructions:
- First and foremost, paint your nails with a base coat.
- After the base coat has completely dried, paint your nails with red nail polish.
- Then, paint four thick black lines in a grid form on each of your nails.
- After that, use a slightly sheer darker red nail polish to paint on top of the black lines EXCEPT where they overlap!
- With the same red polish, paint three stripes horizontally across the nail at the top, middle and bottom of the grid.
- Now, use a gold striper to paint a line down and a line across to finish the look.
- Lastly, apply a top coat and you’re done!
P.S This nail design is very easy but require a lot of patience, remember to wait for your nails to be completely dried before applying the next layer!


If you want something cute and lovely for Christmas, pick this snowman nail polish. With the snowed-under effect on the rest of the nails, you just cannot resists how fabulous are these nails.
Things You Need:
- Base Coat
- Light Blue Nail Polish
- White Nail Polish
- Brown Nail Polish
- Black Nail Polish
- Red Nail Polish
- Orange Nail Polish
- Top Coat
- Brush
- Toothpick or Bobby Pin

Instructions:
- First apply a base coat on every single nails.
- After the base coat has completely dried, paint your nails with light blue nail polish.
- When all the nails are dry, sprinkle some white nail polish on the light blue nails to create that snowing effect.
- After that, paint two circles using white nail polish to create the snowman.
- When the paint is dry, use a toothpick or bobby pin to paint the snowman eyes and button. Then, use your preferable colours to paint the snowman scarf, hat and nose.
- Finish off these snowman nails by applying top coat to create that glossy effect.
6. Mistletoe Nails
Deck the halls with boughs of holly, and then deck your digits with this holly-inspired mani. These cute Christmas nails are sure to bring happy holiday cheer to your hands; plus they’re easy!

Things You Need:
- Base Coat
- White Nail Polish
- Green Nail Polish
- Red Nail Polish
- Dotting tool / Toothpick / Bobby pin
Instructions:
- First, apply a protective base coat.
- Then, when they are completely dried, apply white nail polish. I will suggest you to paint two layers to get that even tone.
- After the white nail polish has completely dried out, grab your green nail polish and your brush to start making 6 small dots in the pattern shown below.
- Then, you can start to play connecting dots by painting loose arched between each dot. It is alright if the lines aren’t perfect as you will be filling them in afterwards.
- Fill in the leaf pattern with green nail polish after you have finished connecting them.
- To create another leave all you need is follow back step 3 to step 5.
- After you have finished painting the leaves, take a toothpick/ bobby pin or dotting tool and dip into red nail polish. Then place the red dots beneath the leaves to create red berries. Add a splash of shine to your berries by adding some white nail polish.
- Finish off these nails with top coat to create that glossy effect.

That’s all for today’s manicure topic and I hope you guys find this interesting.
Get festive ready by giving your nails some Christmasy look in one of the designs above!
And don’t forget to tell me out of the 6 nail arts that I’ve shared with you, which is your favourite?
Give us a comment below and don’t forget to share it with your friends!
Stay tuned for more awesome topics from us and till next time. ![]()


