
Hello lovelies, welcome back!
Recently, I’ve been so caught up in the hype of embroidered trends which is so cute and adorable!
If you’re thinking of buying an embroidered jeans for yourself, why not try to DIY yourself? Because nothing could be cooler than an embroidered jeans that you hand sewn yourself! Plus, you can choose your favourite words and drawings to be featured on your clothes. How cool is that?!
Start one by today and show off your funky little embroidered jeans to your friends! Your friends will be amazed by the artsy side of you. If you’ve no idea how a DIY embroidered jeans look like, here’s a few DIY examples which were done by creative & talented bloggers:


Things you’ll need:
- Thread or Embroidery Floss.
- Needles or Embroidery Needles.
- Scissors.
- Pen or fabric chalk to sketch the words or graphics.
- Pre-wash denim
So, before we start stitching, let me share with you 3 simple embroidery stitch methods which is amazingly simple and cool. Choose one method that you preferred, do some little pilot test before you start stitching it on your denims. This will ensure you to master the technique without ruining your denims. But oh well, you can skip the pilot testing part because as I said, these three embroidery stitches are EASY AS PIE.
1) Running Stitch:

- Firstly, thread your needle with doubled thread and tie a knot at the end of the thread. Poke your needle up through the fabric.
- Leave an amount of space next to where you just came up, and poke your needle back down through the fabric. This will be your first stitch.
- Now, poke your needle back up through the fabric by leaving a space next to your previous stitch. (Keep the space as small as possible if you’re embroidering letterings or graphics on your denim, because you do not want your embroidery stitches look like a dashed or dotted line.) Then, poke your needle back down to make your second stitch.
- Repeat step 1 – 3 and you’ve mastered the running stitch technique!
2) Stem Stitch:
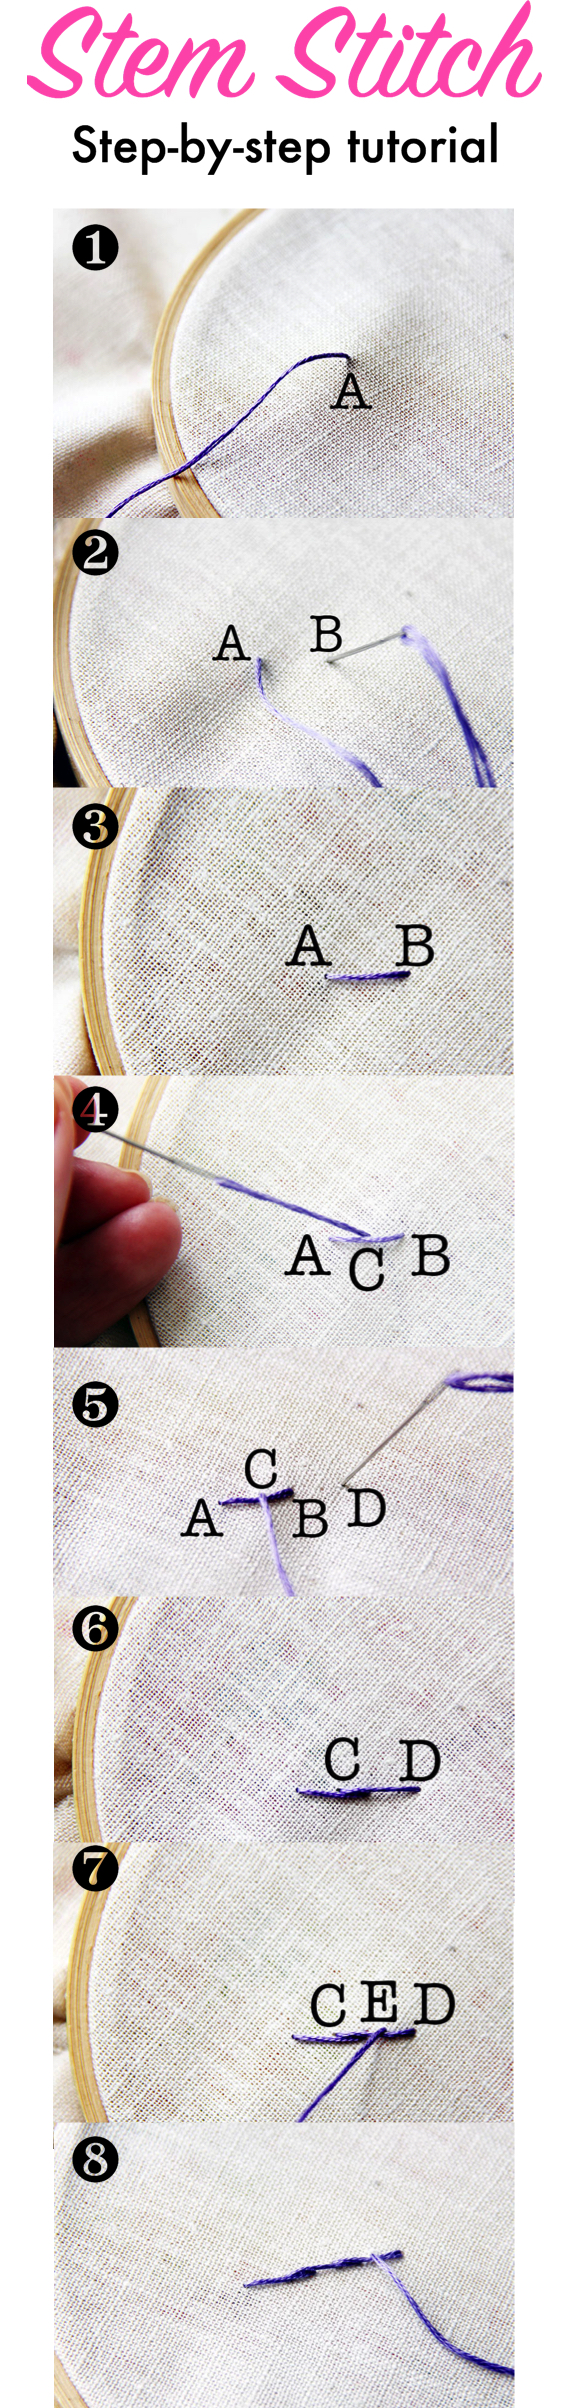
- Begin with threading your needle with double thread. Tie a knot at the back to secure it. Then, poke your needle up through the fabric (point A).
- Once you’ve pulled your thread out from point A, leave a space next to point A, poke your needle down through the fabric (point B).
- Pull the thread down through the back of point B.
- Poke your needle up through the fabric at point C, about the midpoint between point A & point B. Pull the thread up through the fabric.
- Now, leave a space from point C and poke your needle down through the fabric at point D.
- Pull the thread down at the back of point D.
- Come up from point E, which is the midpoint between point C & D, and pull your thread up through the fabric.
- Keep repeating in this manner along your outline and you’re on your way!
3) Chain Stitch

- Begin your stitch by poking the needle up through the fabric. Pull up the thread completely, then, poke your needle down through the same hole you’ve came up. Now that your first stitch is a loop, poke your needle up through the fabric and the loop. Your second stitch should be at the top of the loop.
- Complete your second stitch by poking your needle down through the previous stitch where your needle came up.
- Keep doing it in the same manner until you’ve finish stitching!
Okay! Now that I’ve shown you 3 types of embroidery stitches, you should be able to know how to embroider your jeans by just using needle and thread. Let’s start the fun project!
Instructions:
- Think of what words or graphics you want to embroider on your jeans. Once you’ve decided the words or graphics, sketch the outline on your jeans using a pen or fabric chalk.
- Then, thread the needles with double lengths of thread. This will make your your line substantial and thick enough.
- Tie a knot at the end of the thread.
- Push your needle up through the fabric, at the start of the first letter. This is your first stitch.
- Keep stitching down following the outline of your letters or drawings. You can use any preferred embroidery stitch method (running stitch, chain stitch or stem stitch)
- If you’ve run out of thread, simply knot the thread on the backside of the denim to secure it. Then, start a new stitch by repeating step 2, 3 & 4.
- When you’re finished, tie a knot on the backside of the denim & you’ve got yourself a little DIY embroidered jeans! COOL AF, I KNOW.
That’s all for today’s fun DIY project! I hope you find today’s topic interesting and informative.
If you’ve already made one, show us how you’ve made it because sharing is caring!
Stay tuned for more awesome tips & don’t forget to be awesome today. <3
xx


